8/30/06

PodCasts: CraftyPod #30

Since my new love is Crafty Pod Casts, I will start posting on specific shows that were meaningful, particularly inspiring, &/or just gave me more great ideas. (And I'm patiently waiting for Blogger to give me the new beta, so I can have tags!!)
Lots of very cute ideas, like collecting patches on your trip and attaching as you go to your jacket or bag, making earrings from keychain souvenirs, and visiting local craft stores in the towns you visit. I would add to that, visit the thrift stores, too!
But my favorite idea from this podcast was the lunchbox idea. Sister Diane mentioned taking your supplies with you in a lunchbox, it's portable, and the perfect size for just a few things. Now, I've mentioned before that I like to collect and use tins for my beading projects, so when she mentioned lunchboxes, it was kinda a viola! moment crossed with a "DUH!" moment. (Do you ever have those--the 'why didn't I think of that?' moment)
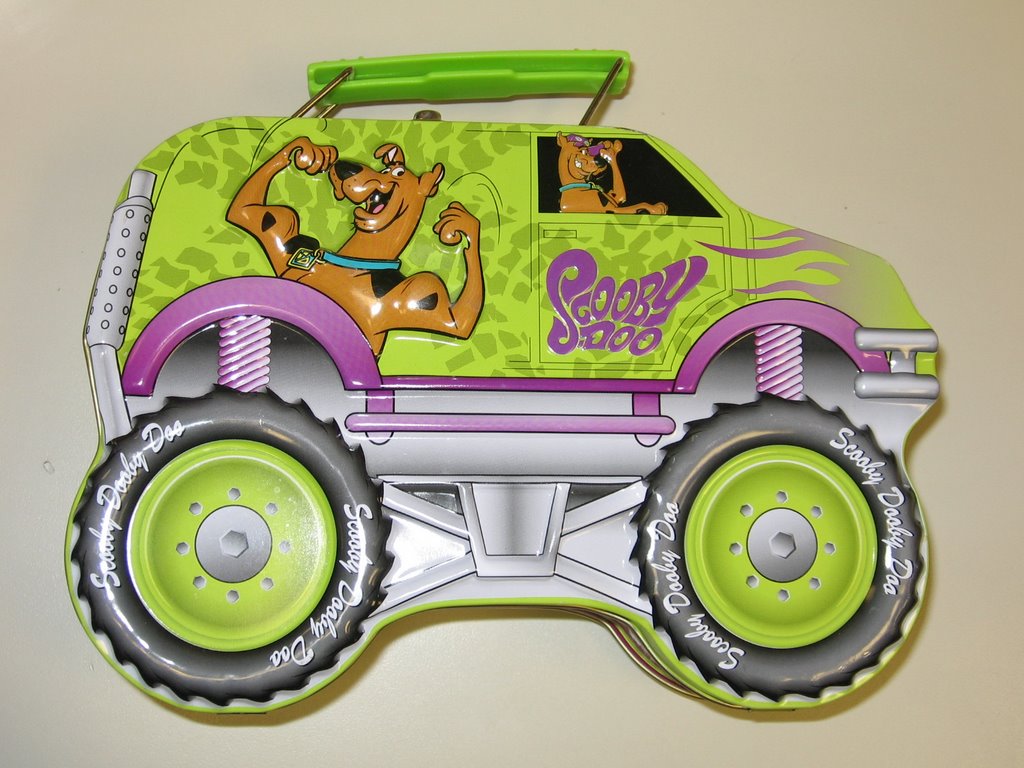
So I used one of my breaks at work to walk over to the thrift store, and I found three great lunchboxes! One is a great size, and I will re-do the outside, one it little and tiger-striped, and the third was the coolest lunchbox I've ever seen: Scooby-Doo in a Monster Truck! Isn't this the coolest lunchbox!?! Rooby-Rooby-Roo! And so much way cooler since I only paid 75 cents for it! I feel like I won the lottery or something when I find something so cool at the thrift store.

8/26/06

Pods

I've got a new crafty addiction. Podcasts! I had been wanting to check them out, my guy listens to several podcasts that he enjoys, I love listening to books on the iPod, and I decided it was time to start listening to some craft related podcasts.
I finished the last part of a long and great book (American Gods) and started listening to some podcasts before starting another book. The two I'm listening to are Craft Sanity and Crafty Pod. They are both great, but are very different. And soooo inspiring. I'll post specifics later, got to get back to listening!!

8/20/06

Growing Things: Finished

Silly me. I am such a photo nerd, I take tons of pictures, but do you think I remembered to take an official 'finished' shot of this before I gave it away. Noooo.
So this is the best shot I have of the whole thing, but this is again before I had sewed it to the pin.
I made this pin for a friend of mine who teaches 3rd grade and loves to garden. She also wears cute kid pins all the time. These things were the inspiration for this pin. When I gave it to her I was in a rush, and I haven't seen her again since then. So I didn't have a chance to take a photo of her wearing the pin. But I'll see her again soon, and get a few more shots.

Growing Things: Comparison

I didn't follow the pattern exactly, I had to do some of the flowers as they happened. And I like how the bottom turned out.
This was before I sewed it to the pin, that's why there seems to be so much green space at the top.

8/19/06

Growing Things: Attaching the Pin

I don't remember if I had run into a snag on finishing this, or if another project just got the better of me, but this was mostly finished when I pulled it back out this spring. I think maybe I wasn't sure about how to finish the bottom, I had envisioned fringe of some sort origionally, but that didn't end up working. Stitching the finished project to the pin back was something I thought a lot about before doing, but it was fairly easy when I figured out how I wanted to do it.

8/18/06

Growing Things: Almost Done


I call myself a temperamental artist sometimes. What I mean by that is that I don't like to be told what to make, how to do something, or when to finish. Boy, deadlines were hard when I was in school. I started this pin probably almost 10 years ago, right after I finished the music bag. I had to purchase lots of beads for this undertaking, with all the colored flowers, luckily the store I purchased my delicas at had some mixed color tubes for sale, I got one in each shade: blues, oranges/yellows, reds, purples, and greens.

8/17/06

Growing Things: The Pin

This is the pin hardware that I purchased to hang the pin on. I don't remember where I got it, because I started this project soooo long ago. I probably got it at Hobby Lobby back when they were still open on Sundays, that was a long time ago.

8/16/06

Growing Things: The Pattern

Somewhere in the stacks of cds/games/discs I have an old copy of Bead Plan. I enjoyed playing with it when I first got it, but I really prefer to draw out patterns by hand. This is one pattern I had made over 7 years ago, started it back then, and finally finished it this spring. It was always meant to be a pin, and I had found the pin bar and started out the pattern by figuring how many bead rows I would have to put on it.
Sorry the picture's so cruddy. If/when I find the pattern again, I'll try to take a better shot of it.

8/12/06

High School: Watercolor


Here's a photograph of a watercolor painting I did as part of one of my high school art classes.
I was experimenting with the technique of laying down some rubber cement before you paint, and then when all the paint is dry, you brush off all the rubber cement. This technique is a lot like batiking I think, although I haven't yet tried batiking.
I was also experimenting with these new watercolors that I had just gotten. These weren't the usual cake watercolors, or even the tube kind, these were liquid, and could even be used as ink. The brand is Dr. Ph. Martin's Hydrus, I think one or two bottles out of 12 or so have actually survived.


A couple watercolor web sources:
Watercolor Online

8/5/06

The Bead Circle

My newest creative internet obsession is this awesome beading forum. I haven't been on many forum pages, so I tend to get lost, and I can't figure out how to make my photos "small" enough to post there, but I will get it all figured out. There's a lot of inspirational stuff, and good folks there. Come check it out!

Since you asked...

Someone Googled here with 'glue for beading' or some such. So here's what I use: G-S Hypo Cement (looks like they also have fabric and paper cement). I bought this at Hobby Lobby for $3.99, as you might see from the price tag if you look really close. This purchase was probably around 2001, so it may be a bit higher now.
I had actually been looking for fake fingernail glue, as I had read somewhere that for the stretchy plastic cord that was new at the time, ff glue would work very well because it was made for plastics. I'm not a fake fngernail kind of gal, so I didn't have luck finding that glue, so I checked out the hobby store. I think I actually found it with the models or trains, but it said it would work for jewelry, too. I've been using it ever since on all beading knots, even regular beading thread.
Before I found this, I used clear fingernail polish on beading thread knots. It was very hard to get the polish where I wanted it to go, and much more stinky than this glue.

8/2/06

Current Project at Work


Here is an updated picture of the project I'm working on right now at work. A bit more cloth covered than the last time I posted a photo. Almost finished with the body part, can't wait to get to the fringe.