Yesterday was one of my favorite things about working for the state: Arbor Day is a paid holiday here! I got Friday off, the kids still had to go to school (hey, they get the whole summer off!), so I could do my own things.
First a little nap, which turned into sleeping too long, but I guess I needed it! The afternoon and evening, I spent working on my art supply cupboard, which I am affectionately calling my 'nest'. I got it all rearranged, and mostly organized, fitting the various tubs, boxes, and crates in like a Tetris puzzle. I will need to reorganize some of the stuff in some of the containers as I use them, and hang up a few things on the insides of the cupboard doors, but it's mostly done.
Done enough, that I was able to start a project this morning that's been working in the back of my head for a while, it was right in the front of my cupboard, and I had a few minutes, so I did a little work. That's my goal, to be able to work even a little at a time. With no dedicated arts-n-crafts room or area that I can leave things out, I have to be more organized, thus the nest.
In crocheting news: I made two hats this week!
I made up a pattern starting Tuesday, finished the first hat Wednesday, wrote it all down, as best I could, and tried to recreate it Thursday and Friday. The second hat is slightly different than the first, in a couple small ways, so I'm working on the third one now, trying to perfect the pattern. When I get the pattern figured out for sure, I'll share it! Here's a tease: the name of the hat is the Granny Star Hat.
Off to crochet club, maybe one of the experienced hookers can tell me where the second hat is different.
4/26/08
4/23/08
Sandals, Segues, & Super Glue
I am a skirt gal. Work clothes, chore-doing clothes, even my jammies usually aren’t pants. My problem is that I haven’t found awesome shoes that work with skirts in the cold months. I’m not a ‘dress shoe’ gal, which lends itself to the problem. Sandals and skirts, that’s me. I get teased for wearing my sandals into November, but I don’t get them out too early in the spring, my toes are shy of the chill in the very early spring. Our spring so far has been overcast and soggy and cold most weeks, and the heating/cooling at work tends to be really strange this time of the year, though I have been able to get the sandals out a couple weekends. Today is the first week day that my little toesies were brave enough to come out and play! And I’m wearing my $5 sale skirt for the first time! Yay Spring!
Another sign of spring has wheeled by me every workday for a couple weeks. Picture this: a well pant-suited woman in maybe her 60’s, completing her outfit with a light leather coat and cabbie cap, short gray hair flipping in the breeze as she zips by you on a Segue. On her way home each day, she goes down the street my parking lot is on. She is an everyday hero, an inspiration to do my part for the Earth, and to be myself! The first time I saw her, I was chatting with my brother who lives close to my parking lot, and we both commented how cool it was to see. Last week, I tried to share my excitement with a co-worker also on her way to the lot, and pointed out ‘Isn’t that cool!?’ to the reply, ‘kinda weird for Nebraska’ (from a gal who drives a huge white pickup truck every day to an office job). All the more inspiration to be myself, Nebraska is full of all kinds of people, despite what stereotypes are put on us, by outsiders and insiders alike.
And in my parking lot, just a couple days ago, I thought I found a treasure! I watch the ground as much as the sky for beauty and inspiration, and occasionally, on the ground there might be something worth picking up. I have ideas of found art, and Artist Extreeme is always collecting cool stuff for his projects as well. So on the ground the other day, was a full tube of super-ish glue. Full. I just bought a new bottle of brush on, finding the brush perfect for some tasks, but one can always use another tube of glue. Score! I thought, and went to pick it up. Well, it must not have been completely full…some of the glue was used for it’s last act of gluing…it was glued to the concrete! As I stood up, I glanced around to make sure I wasn’t being pranked, and laughed. I was pranked by some random accident.
4/18/08
Dreaming Of Crocheting
Since I'm still not able to get new photos uploaded, and the blog is getting awful word heavy, I dug through a bunch of old photos already on flickr to find a good one to share.
Here is adorable Baby Shelly, brand spankin' new to the world. I labeled this as being 1964, but since I was born only 11 days before the end of the year, and a full seven of those I was still unwrapped in the hospital, this is probably actually 1965.
I remember this quilt, no not from this time of my life, from later! It was multicolored, maybe even a using up leftovers kind of project. I'm sure it is crocheted just by looking at it, but I don't remember who made it, this photo wasn't taken at our house, it was at Grandma's. I wonder where this awesome quilt is now? And I wonder if I can figure out the pattern just from the photos?
4/17/08
Poly Clay: Sculpture - Making Push Molds
Funny, I'm really enjoying these posts on polymer clay, sharing 'all my knowledge' (with tongue firmly planted in cheek saying that), and doing research to find more info. But it seems that every time I hit post, I start thinking of more stuff. Either second guessing myself that I completely left something out, or usually, just more, more, more! stuff I can add.
On that note:
A little more on making your own push molds.
Making a mold from more poly clay, is very easy, and you don't have to purchase anything extra, but it won't be nearly as flexible as the silicone kind. You will definitely need to put some sort of talc or powder in the mold because the clay will want to stick to itself. The firm clays hold the shape well, but you could even leave the object you are making the mold from in the clay when you bake the poly clay mold IF it will withstand the oven temperature.
Using the silicone two-part medium to make a mold will make your mold much more flexible, but there is a tricky time frame involved. You mix the two substances together, and within a few minutes (I think it depends on the brand, but about 10) it will start to harden, so you have to be on top of things when you get ready to mix.
Either way you do it, you can make a mold from anything, ANYTHING. Buttons, pendants, silverware patterns, leaves, toys, stuff from gum ball machines, game pieces, sticks, other crafts, cloth, anything you find laying around.
Again, if you make a mold from something that was originally designed by someone else, there is the tricky matter of can you sell it as your own.
4/12/08
Poly Clay: Sculpture - Push Molds & Rubber Stamps
Categorizing all the different ways to use poly clay, I had thought to put push molds and rubber stamping the clay into the 'everything else' category, but in my research on sculpture, I decided they could kinda go in this category as well.
A push mold is a mold that has been made from a sculpted object, usually in a bas relief. Poly clay (or other mold-able material) is put into the mold to take the shape of what was molded. After molding, the resulting piece can be used in numerous ways, the face of a doll, on a pin or pendant, as one part of a larger piece, or just the molded piece itself.
We can buy molds, from simple molds, to incredibly intricate molds, to even a whole fairy mold. Or we can make our own molds, usually with a silicone molding material, or even with more poly clay.
There are many FAQ's and tutorials available on the interwebs that can get you started. Push molds can be a great way to make a sculptured piece, especially for a beginner or someone who doesn't care for sculpting by hand.
Rubber stamping on clay makes patterns or textures on the clay, which is a simple way to make intricate looking medallions or other jewelry. There are many places to get rubber stamps, some are more specific to texturing clay, but any and all rubber stamps work. And again, we can make the stamps ourselves, from carving (here's a couple tutorials: One and Two) or having your own art work made into a stamp. When looking for or making stamps, remember to think a little differently than if you wanted the stamps for stamping on paper, the stamping surface will push into the clay, so remember to use that to your advantage.
Both of these methods create a wonderful textured and 3D effect, and have many possibilities, the only drawback that I see, is that if you use a purchased push mold or rubbger stamp, it is not your own handiwork. That's perfectly fine, and a good choice for a lot of people, but if you are wanting to sell what you are making, you'll need to look into the legality of selling something made with someone else's molds or stamps. I learned that there are Angel Companies out there who allow you to use their push molds and/or rubber stamps to make things you are going to sell, so that could be a good option.
I have always wondered how other techniques, especially millefiori and mokume-gane would work put into a push mold or rubber stamped. I haven't seen others doing it, so I may have to try that myself!
4/8/08
Felted Bag: Sans Button (and Photo)
Well, I must have used up my photo mojo Saturday, when I went I went to upload the "finished" photos, I'm somehow locked out of iPhoto. It's some networking issue, and the BFF will have to figure it out later this week. Then I'll put up more photos.
The bag is very cute, and I'll just need to find or make a button in the right size for it, and it will be done.
The only thing that I didn't really like in the whole process was some tiny white-ish bits of fluff that got felted into some of the fiber. Probably from the towel I put in the wash with it, or just from the washer itself, it really wasn't much at all. But I had to get every last piece off, with scissors and duct tape. I'm not sure if putting it in a pillowcase bag, which I had decided not to do, would have stopped that, but I may try that net time.
And since then, nothing on the hook. I don't know why, I guess I'm just not sure what to do next. I'm kinda tired of dishcloths at this moment, and I read the chart pattern to learn a granny square, so I think I might be able to read another chart, and maybe I'm this close *.........* to being able to read a real pattern, so what to tackle next?
Maybe I'll frog that last dishcloth and try a different hat, those colors are too cute not to wear!
4/5/08
Felted Bag: One Wash Down
After restarting the washer, I had to walk away, I was starting to obsess too much! I forced myself to just wait until the wash cycle was finished to peek again.
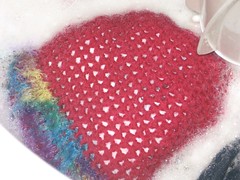
So after one trip through the washer, this little wet doggie of a bag is still a little soapy, but I'm doing the look-what-I-made dance and singing 'it worked! it worked!' until I woke up the rest of the house!
It needed another trip through, and felted up even a little more. It's now happily in the dryer for a little bit to just take the edge of the wetness off, then will be dried flat overnight.
Photos of the finished and dry bag tomorrow, now it's off to chores!
(but I certainly don't mind chores as much when I have already done something soooo cool today!)
Felted Bag: IN the Washer
Working on the handle last week at crochet club, I got a little discouraged about this project, when the gals were discussing the kinds of stitches that worked well for felting. Whoops, I hadn't even thought about what KIND of stitches to use. Now after it's done, I see on many sites that people recommend bigger stitches. I figured the handle would be fine, but was still a bit worried about the bag itself...
I stuffed it full of plastic grocery bags before washing, thinking that would help the front and back not stick to each other, but of course all the bags did was come out and get washed with the rest of the stuff. ;p
But with the bag all stuffed with bags, I thought maybe the stitches were big enough.
I used the hottest temperature, the smallest size load, added Dawn dish detergent because one blog said Dawn specifically worked very well to help felt, added a towel and a pair of jeans, and let it go through the agitation cycle once, then the whole wash cycle again.
Felted Bag: Before the Washer
I've been going to a crochet club on Saturday mornings for the last few weeks, but today as I was getting ready, I was trying to figure out what project to take, and the only project I could think of was this bag. It was just finished as of last night, and I was very excited to try felting it, so I decided to play hookie from club this morning, and work on felting it instead.
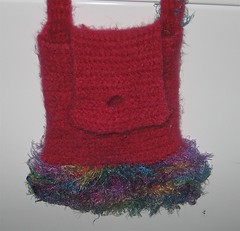
You can see from the photo, that the bag got bigger where the fun fur was added, this wasn't surprising, but I hadn't thought it through so I was very glad I had put it at the bottom. After the fun fur, the rectangle was a little larger than it had been, but I compensated for that when I stitched the sides together.
I added the decoration on the handle to mask some bulky stitches. The beginning of the handle flowed very smoothly, but stitching the handle back into the bag wasn't quite so smooth. So some extra color to cover that up!
There are more 'before' photos at flickr, just click on the photo to get there.
Felted Bag: The Yarns
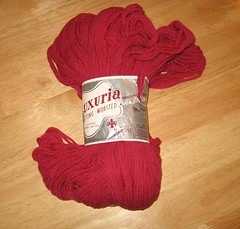
I've probably mentioned before that sometimes my mom will bring me yarn or other crafty supplies that are discards from one of their volunteer jobs. (thanks again, Mom!) And last year, part of the leftovers included this old fuchsia wool. I knew this wool would be perfect to experiment with felting, and the fun fur yarn that I thought was the same lot number, but wasn't (see photo below), would be perfect to go with it.
I started two weeks ago, this was my breaks-at-work project, mostly. I didn't take any in-progress photos, sorry. I decided to just make one long rectangle, fold it over, and stitch up the sides to make a pouch type of bag. I wasn't sure the best way to add the fun fur, and started out crocheting both together, until I realized that the wool probably wouldn't felt too much if the fun fur was completely mixed in. So I decided to aim for the fun fur to be at the bottom. I single crocheted along with just the wool, then added the fun fur, then back to just the wool, then decreased on the sides a bit and made a flap.
I was very impressed with myself when I actually made a kind of buttonhole in the flap. We'll see how that turns out! I started and frogged the handle part several times, first thinking I wanted it to be round like the inspiration bag, but ending up with a very cool flat stitch.
Felted Bag: The Inspiration
I go thrifting fairly often. In fact, one of my favorite grocery stores is my favorite partly because of being right next to a little thrift store. So it's pretty easy to scan the thrift store quickly before getting the groceries. (not so quickly if I have a kid with me, I think they like thrifting even more than me if that's possible)
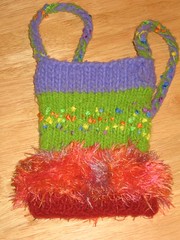
About a year ago I saw this cutie purse, which appears to be partly felted, and partly fun fur. Funny thing, I didn't buy it the first time I saw it, then I kicked myself for a week until I went back, and luckily it was still there! It is not a size I would use, which is partly why I didn't buy it the first time, but I bought it for inspiration. I took a bunch of photos of it, and gave it to a wonderful young woman who enjoys it very much.
This was way back before I could crochet, when I was just starting with the knifty knitter, but I really wanted to make something cute like this.
4/2/08
Poly Clay: Sculpture
I would say sculpture is sculpture, no matter the medium, and there are two basic ways (or, of course, a combination of the two) to achieve the sculpted form: taking away from, and adding to.
Sculpture by taking away from, or carving, can be boiled down to a joke (or artistic legend) that I've heard once or a million times. To carve a sculpture of a horse (or whatever), take your stone (or wood, or polymer clay chunk, or soap, or concrete, or candle wax), and carve away all the parts that do not look like a horse. ;p Wish it were all just that simple.
Sculpture by adding to is building that horse with lots of smaller pieces. Again, because the coolness of this medium is the color IN the clay, sculpture by adding to is most popular.
I haven't actually seen a lot of carving of poly clay, not at least in a traditional 3D sculpture, but more in carving stamps, and
other flatter pieces.
Using the color in the clay, building up a sculpture can be extremely beautiful. Artists can use different colors for every different detail, however tiny, or use fleshy colors to make gorgeous figures.
One of my greatest inspirations in this category, happens to also be my first cousin. Alicia has made some of the most fantastic dolls, several in the theme of her favorite musical, Phantom of the Opera. I also really love her almost unsettlingly beautiful Bird Doll, which was, I believe the predecessor to her line of Parrot Jewelry.
After all that inspiration, if you need any more of a push to get your fingers into the clay, here is a great Puppy Tutorial and a Mummy Video Tutorial.
Subscribe to:
Posts (Atom)