When I finished the sides and top, I had a small delema: I didn't know what I was going to put on the sides for decoration. Since I had used golden hues, and because autumn is probably my favorite season, of course fall leaves came to mind first. But I didn't want the project to be seasonal, I didn't want it to be something that was put away. So even though I could picture cute leaf shapes all over the sides of the box, I really wanted to think of something else.
I went to visit my Grandma a couple weeks ago, something I definately need to do more often, and I brought the project along, to work on while we chatted. I didn't realize until I was there, but I was almost finished with everything I could do before adding the decoration. I wasn't my Grandma's only visitor that night, my cousin A, and her youngest daughter were there for a while, too. I always think about how cool it is to have a large family when I see my cousins. Here was my first cousin and her daughter, around 5 or 6, I remember when A was about that age, and I was in Jr. High or High School, and would play games with her and put makeup on her when we visited Grandma and Grandpa on the same weekend. And when I was young, A's mom, my Cake Decorating Auntie, babysat me sometimes. My mother is enough older than my Cake Decorating Auntie that Auntie was just in elementary school when my parents got married. My kids are teenagers, and my little is cousin all-grown-up and her little daughter is just learning her alphabet.
My cousin's daughter was coloring intently during our visit. She was drawing T's, big fat T's. I asked her why she was drawing T's but she didn't really have an answer. Her name doesn't start with T, I mentally checked off her immediate family, nope, no T names. I asked her if it was "T" week at school, and it wasn't. And then I just realized that T's are just cool to draw. And she wasn't just drawing T's, each T had it's own world, with backgrounds of cities and trees. Fat T's with stripes or polka dots. So when I brought up my delema of what to put on the box for decoration, my cousin said polka dots would be nice, just like her daughter had been drawing.
Perfect! Before I left that night, I had cut out and sewn on the first dot.
The next day at work, I cut out a bunch more dots. I felt like that old comic book character, Dot, putting dots on everything.
10/30/07
10/23/07
The Next Felt Project
When I finished the Zombie dice bag, and especially because I finished it so quickly, I wanted to keep up the momentum and start something new right away.
I didn't have anything planned, only a couple things I am still designing, that would take too long to start. Well, I've always wanted to make a crafty, kitchy, cutesy tissue box holder for my work desk, so I thought I'd jump right into that.
I checked at home for a pattern, just for the size of the squares, but I didn't find anything in my quick search before work. Somewhere in there, I realized that I could just measure the tissue box on my desk and figure it out myself. Duh!
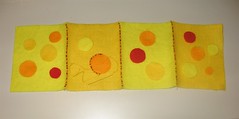
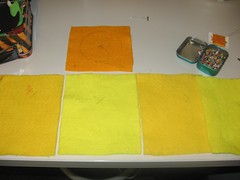
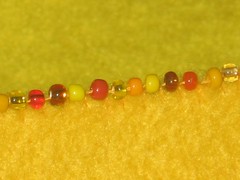
So still in get-something-started mode, I looked at the felt that I had, mentaly measuring to see what color or colors would satisfy my embroiderlust. I had gold and yellow, each enough to make two sides of the box, and an orangy-gold for the top, and leftover bits of all three for decoration, whatever that was gonna be.
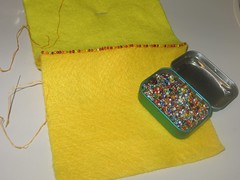
I've done the random bead in a beaded blanket stitch, and liked the results. I did the finger puppets and barrettes all with random regular (can't see through them--what's that word??) beads, but I had random transparent beads, too. So I mixed a bunch of the transparent and a bunch of the, er, non-transparent beads into this little mint tin.
(Note to my fellow tin collecting folks: Walgreens sugar free intense wintergreen flavored mints. Also in red in cinnamon, but I haven't tried those yet. Good mints, awesome little tin!!)
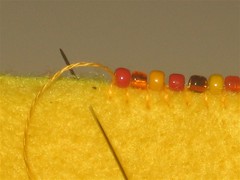
I used all the random browns, oranges, reds, yellows, and golds that I could find. In the sets of cheapo random beads, there were several of each.
Most of my beaded embroidery projects so far, or maybe all, I've used a contrasting color for the blanket stitch, to make it stand out more. On this project, I decided to use a similiar yellow/gold-ish color on the whole project to tie it all together.
I didn't have anything planned, only a couple things I am still designing, that would take too long to start. Well, I've always wanted to make a crafty, kitchy, cutesy tissue box holder for my work desk, so I thought I'd jump right into that.
I checked at home for a pattern, just for the size of the squares, but I didn't find anything in my quick search before work. Somewhere in there, I realized that I could just measure the tissue box on my desk and figure it out myself. Duh!
So still in get-something-started mode, I looked at the felt that I had, mentaly measuring to see what color or colors would satisfy my embroiderlust. I had gold and yellow, each enough to make two sides of the box, and an orangy-gold for the top, and leftover bits of all three for decoration, whatever that was gonna be.
I've done the random bead in a beaded blanket stitch, and liked the results. I did the finger puppets and barrettes all with random regular (can't see through them--what's that word??) beads, but I had random transparent beads, too. So I mixed a bunch of the transparent and a bunch of the, er, non-transparent beads into this little mint tin.
(Note to my fellow tin collecting folks: Walgreens sugar free intense wintergreen flavored mints. Also in red in cinnamon, but I haven't tried those yet. Good mints, awesome little tin!!)
I used all the random browns, oranges, reds, yellows, and golds that I could find. In the sets of cheapo random beads, there were several of each.
Most of my beaded embroidery projects so far, or maybe all, I've used a contrasting color for the blanket stitch, to make it stand out more. On this project, I decided to use a similiar yellow/gold-ish color on the whole project to tie it all together.
10/18/07
Zombies!
As I mentioned earlier, I took some felt and thread to the gaming convention to have something to work on. While there, I only got the eye socket sewn onto the dark green, but the next week, I got the whole project done.
When I started, I only had a couple Zombie faces in mind, wasn't sure what they were going to end up being. RawkStar suggested a dice bag, which was the perfect idea!
When I finished both Zombie faces, I sewed them onto a felt piece, after folding down the top and stitching to make a tunnel for a gathering string to go through.
"Teeth" is a Zombie who's face is falling off, and his teeth are showing through his face.
I'm not the only one embroidering Zombies these days... This awesome Zombie gal has been shown on some top blogs this week, and this guy is also awesome!
This side of the bag features the Zombie "Brains". I did the brain stitching in backstitch, and did the whole brain randomly.
When it was mostly done, ExtreemeArtist gave me the idea to make a dangling eyeball. I'm very happy with how that part turned out. One strand of grey embroidery floss, and three of red, connected the eyeball to the face, and I used a macrame weave to make the cord that attached the dangling eyeball.
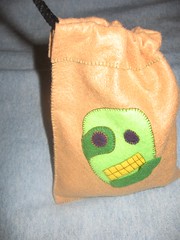
When I started, I only had a couple Zombie faces in mind, wasn't sure what they were going to end up being. RawkStar suggested a dice bag, which was the perfect idea!
When I finished both Zombie faces, I sewed them onto a felt piece, after folding down the top and stitching to make a tunnel for a gathering string to go through.
"Teeth" is a Zombie who's face is falling off, and his teeth are showing through his face.
I'm not the only one embroidering Zombies these days... This awesome Zombie gal has been shown on some top blogs this week, and this guy is also awesome!
This side of the bag features the Zombie "Brains". I did the brain stitching in backstitch, and did the whole brain randomly.
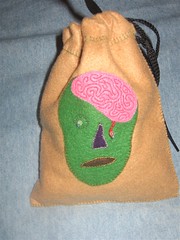
When it was mostly done, ExtreemeArtist gave me the idea to make a dangling eyeball. I'm very happy with how that part turned out. One strand of grey embroidery floss, and three of red, connected the eyeball to the face, and I used a macrame weave to make the cord that attached the dangling eyeball.
10/11/07
Miniature Painting
This is what the table looked like where we could do the 'paint and take'. Bunches of miniatures to choose from, plenty of paints, brushes, plates for pallettes, everything you need.
The little block of wood in the front has gummy stuff on it, you can stick your miniature on the wood so you don't have to hold onto the miniature itself. That saves painting your fingers. ;p
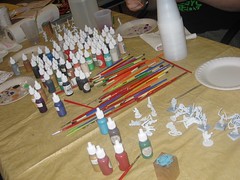
The little block of wood in the front has gummy stuff on it, you can stick your miniature on the wood so you don't have to hold onto the miniature itself. That saves painting your fingers. ;p
10/9/07
Gamey Vacation Report. The Final Chapter
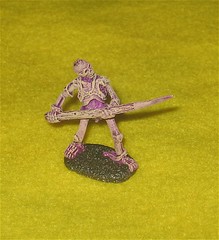
Here's the other miniature I painted. I learned that skeletons are super easy to paint if you use two techniques: a wash, and drybrushing. First, you wash the whole mini in dark brown or black (I, of course, can't follow directions and had to use dark purple), using a wash of miniature paint and water. When that is completely dry, you drybrush your cream or white (or in my world, orc flesh green). The trick to drybrushing miniatures, and I think this trick goes for any kind of drybrushing, is to make sure you don't have too much paint on your brush. This means you have to go over it several times, but that's better than too much paint.
Keeping my eyes peeled for creativity and artistic ideas, I noticed the beautiful fountain the campus had. The campus was in general very beautiful, and it was way cool to be outdoors in the middle of the night after gaming into all hours, and walk through the campus.
I was also very inspired by being able to join in some playtesting of new games. Games that may some day have beautiful bits, while in playtesting mode are just on index cards with self-laminated chits. Very fun to play games while they are still in their infancy. I am inspired to work on my own games soon.
10/7/07
Gamey Vacation Report. Part 2-Electric Bugaloo
One of the activities at the gaming convention was a 'make and take' paint your own miniature. You could paint one per day, free paint and miniatures provided by Reaper. If you've never seen painted miniatures, you're missing out. First of all, they are tiny little sculptures, which I mistakenly thought were origionally carved much larger then the molds were shrunk down. So who ever is out there carving these tiny things, those folks are amazing. Secondly, there are some people who paint minis as a hobby that paint these tiny things so fantastically. I have only painted minis at conventions, so I have just a handfull.
On Saturday, there was also a painting miniatures class, which it worked out that I was able to go to. That is where I painted the miniature in the last post. I learned a layering, a wash, and a drybrush technique that are secrets of the wonderfully painted minis, and these techniques work translated into other mediums.
Another thing that was advertized that piqued my creative interest was an "Artist's Jam". It wasn't scheduled at any specific time, and I wasn't sure what to expect, but I brought my sketch pad and some pencils.
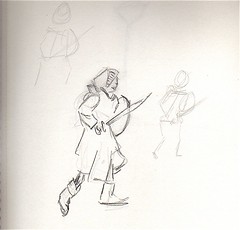
I guess I was maybe imagining that there would be something at the "Artist's Jam" to sketch. Like a model of some sort, not necessarily live, but I'm not really the sketcher that can just sit and draw whatever, so I dug the mini I had painted to use as my tiny model, and the picture here is the result of my "Jamming", just some figure sketching of the mini.
After a few more games, I came back to the "Artist's Jam" area, and started on my felted Zombie. It wasn't specifically about sketching, I had realized, and although I am very proud of myself for sketching in public, and with others, the "Jam" was more about being together each doing our own thing, and I was more comfortable with my needle than I was with my pencil that day.
On Saturday, there was also a painting miniatures class, which it worked out that I was able to go to. That is where I painted the miniature in the last post. I learned a layering, a wash, and a drybrush technique that are secrets of the wonderfully painted minis, and these techniques work translated into other mediums.
Another thing that was advertized that piqued my creative interest was an "Artist's Jam". It wasn't scheduled at any specific time, and I wasn't sure what to expect, but I brought my sketch pad and some pencils.
I guess I was maybe imagining that there would be something at the "Artist's Jam" to sketch. Like a model of some sort, not necessarily live, but I'm not really the sketcher that can just sit and draw whatever, so I dug the mini I had painted to use as my tiny model, and the picture here is the result of my "Jamming", just some figure sketching of the mini.
After a few more games, I came back to the "Artist's Jam" area, and started on my felted Zombie. It wasn't specifically about sketching, I had realized, and although I am very proud of myself for sketching in public, and with others, the "Jam" was more about being together each doing our own thing, and I was more comfortable with my needle than I was with my pencil that day.
10/5/07
Gamey Vacation Report. Part 1
When we last left our hera, she was about to head out to a weekend game convention, complete with tiny new purse.
Well, the purse has lasted quite well, with only a few small issues about it's, well, smallness. But more on the tiny purse another time.
On to the report from the Game Convention!!
I took off the whole day Friday, tho we were leaving town around 3:00, and finished the shopping and packing Friday morning. One thing I needed to pack, to figure out, was a small project. I really wanted something that I could work on quickly and easily, and would fit in a small space. If I were a knitter or crocheter, I imagine projects would be easy to take along, but even those would be bigger than what I wanted to take with me this time. Since I've been doing the felt embroidery lately, I decided I could easily take some cut pieces of felt, tiny scissors, and a few colors of embroidery floss, and they would all fit in my small (4x5) tin lunchbox. But what project to start?
After looking around Crafster last week, I saw this awesome zombie doll, and it made me think, Hmmmm, I could felt embroidery a zombie!
So, in a rush, because by the time I did the errands I had to do Friday morning, I was somehow behind schedule, I cut out some free form shapes based on a couple zombie face sketches I had done. At the last minute, I realized I had forgotton to bring home the needle from work that I had been using, and had to dig out an old needle that was bent, but at least I found one!
I didn't end up having a lot of time to embroider, but that means I was busy with other things, but I got one eye socket done while I was there. Other artsy/craftsy goodness of the weekend included the artist's jam, painting miniatures like the one shown, and tons of great ideas and inspiration.
More on the specifics later.
Subscribe to:
Posts (Atom)